> For the complete documentation index, see [llms.txt](https://ticketking.xyz/docs/llms.txt). Markdown versions of documentation pages are available by appending `.md` to page URLs; this page is available as [Markdown](https://ticketking.xyz/docs/es/primeros-pasos/build-your-first-panel.md).
# Crea tu primer panel
De "acabo de invitar al bot" a "los miembros pueden abrir tickets", la ruta rápida.
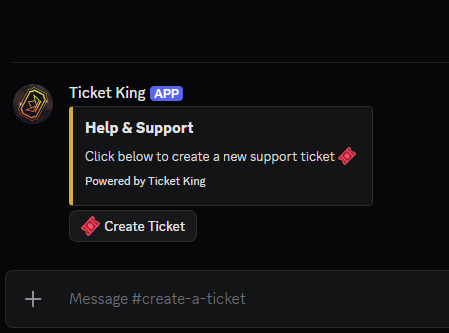
A **panel** es el mensaje en el que hacen clic tus miembros para abrir un ticket. Esta página te guía desde cero hasta un panel funcional en unos minutos.
{% hint style="info" %}
Esta es la forma más rápida. Para ver cada opción, ajuste y personalización, consulta [Paneles](/docs/es/paneles/overview.md).
{% endhint %}
{% stepper %}
{% step %}
### Elige un canal para el panel
Decide qué canal de Discord contendrá el mensaje del panel. La mayoría de los servidores crean un canal dedicado como `#tickets` o `#support`. Configúralo para que los miembros puedan verlo pero no chatear en él, y para que las personas que necesitan soporte puedan acceder a él.
{% endstep %}
{% step %}
### Abre el creador de paneles
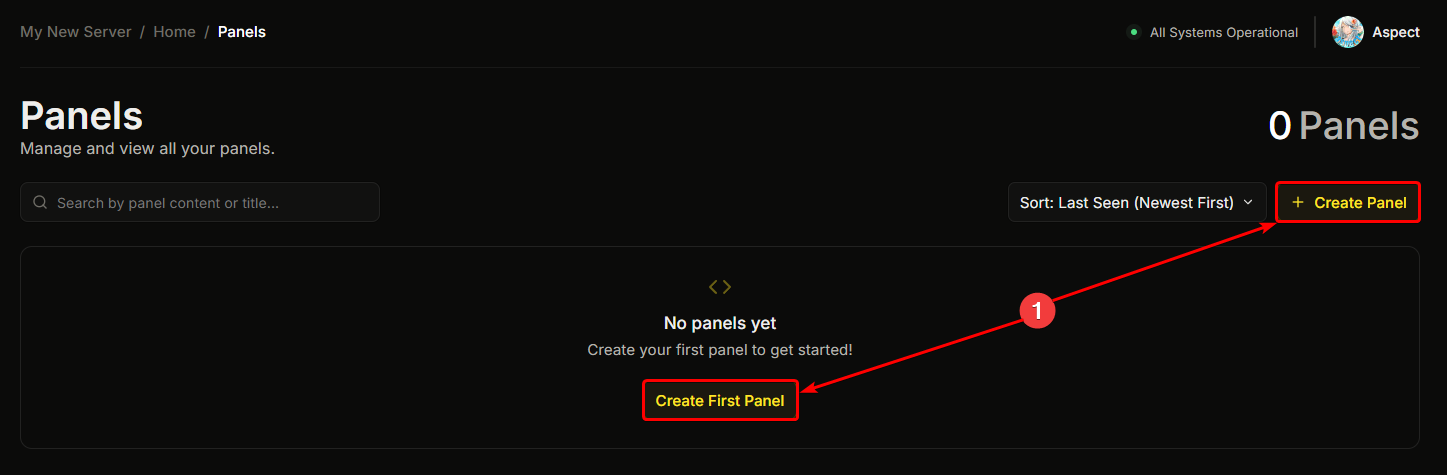
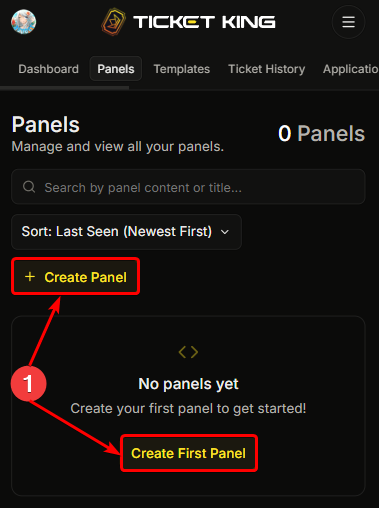
En la barra lateral del panel de control, ve a **Paneles**, luego haz clic en **+ Nuevo panel**.
{% tabs %}
{% tab title="Escritorio" %}
{% endtab %}
{% tab title="Móvil" %}
{% endtab %}
{% endtabs %}
{% endstep %}
{% step %}
### Sigue el asistente
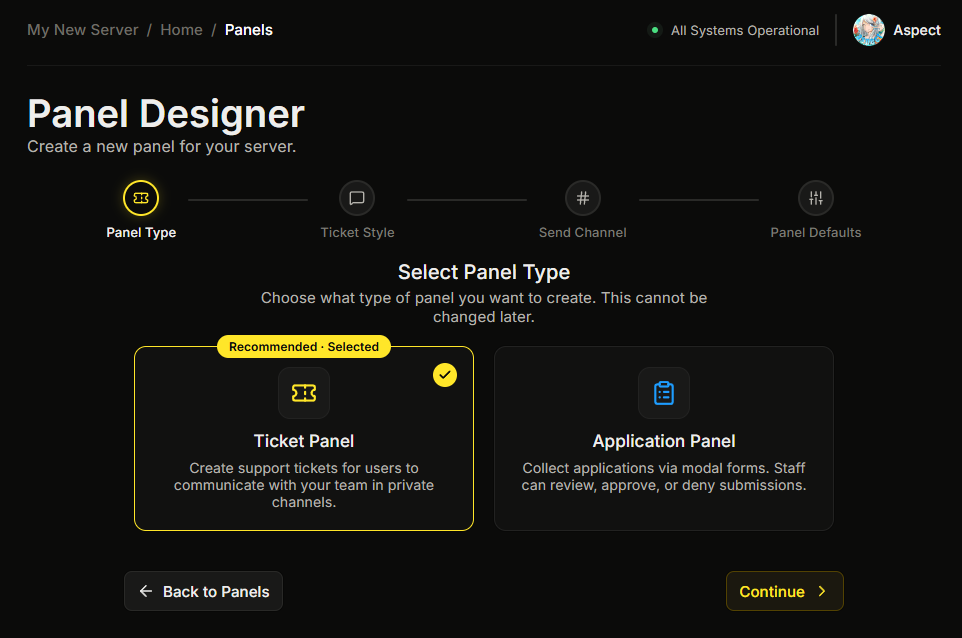
El creador te hace unas pocas preguntas rápidas. Los valores predeterminados están bien para tu primer panel, así que puedes hacer clic sin más.
* **Tipo de panel.** Panel de tickets (el predeterminado) o Panel de solicitud. No puedes cambiar esto más tarde.
* **Estilo del ticket.** Canal de texto (el predeterminado) o hilo. Este paso aparece solo para paneles de tickets.
* **Canal de envío.** El canal donde se publicará el mensaje del panel. Elige el canal del paso 1.
* **Valores predeterminados del panel.** Valores opcionales que hereda cada opción. Puedes omitirlo y configurarlo más tarde.
→ [Crear un panel de tickets](/docs/es/paneles/create-a-ticket-panel.md)
{% endstep %}
{% step %}
### Personaliza el panel (opcional)
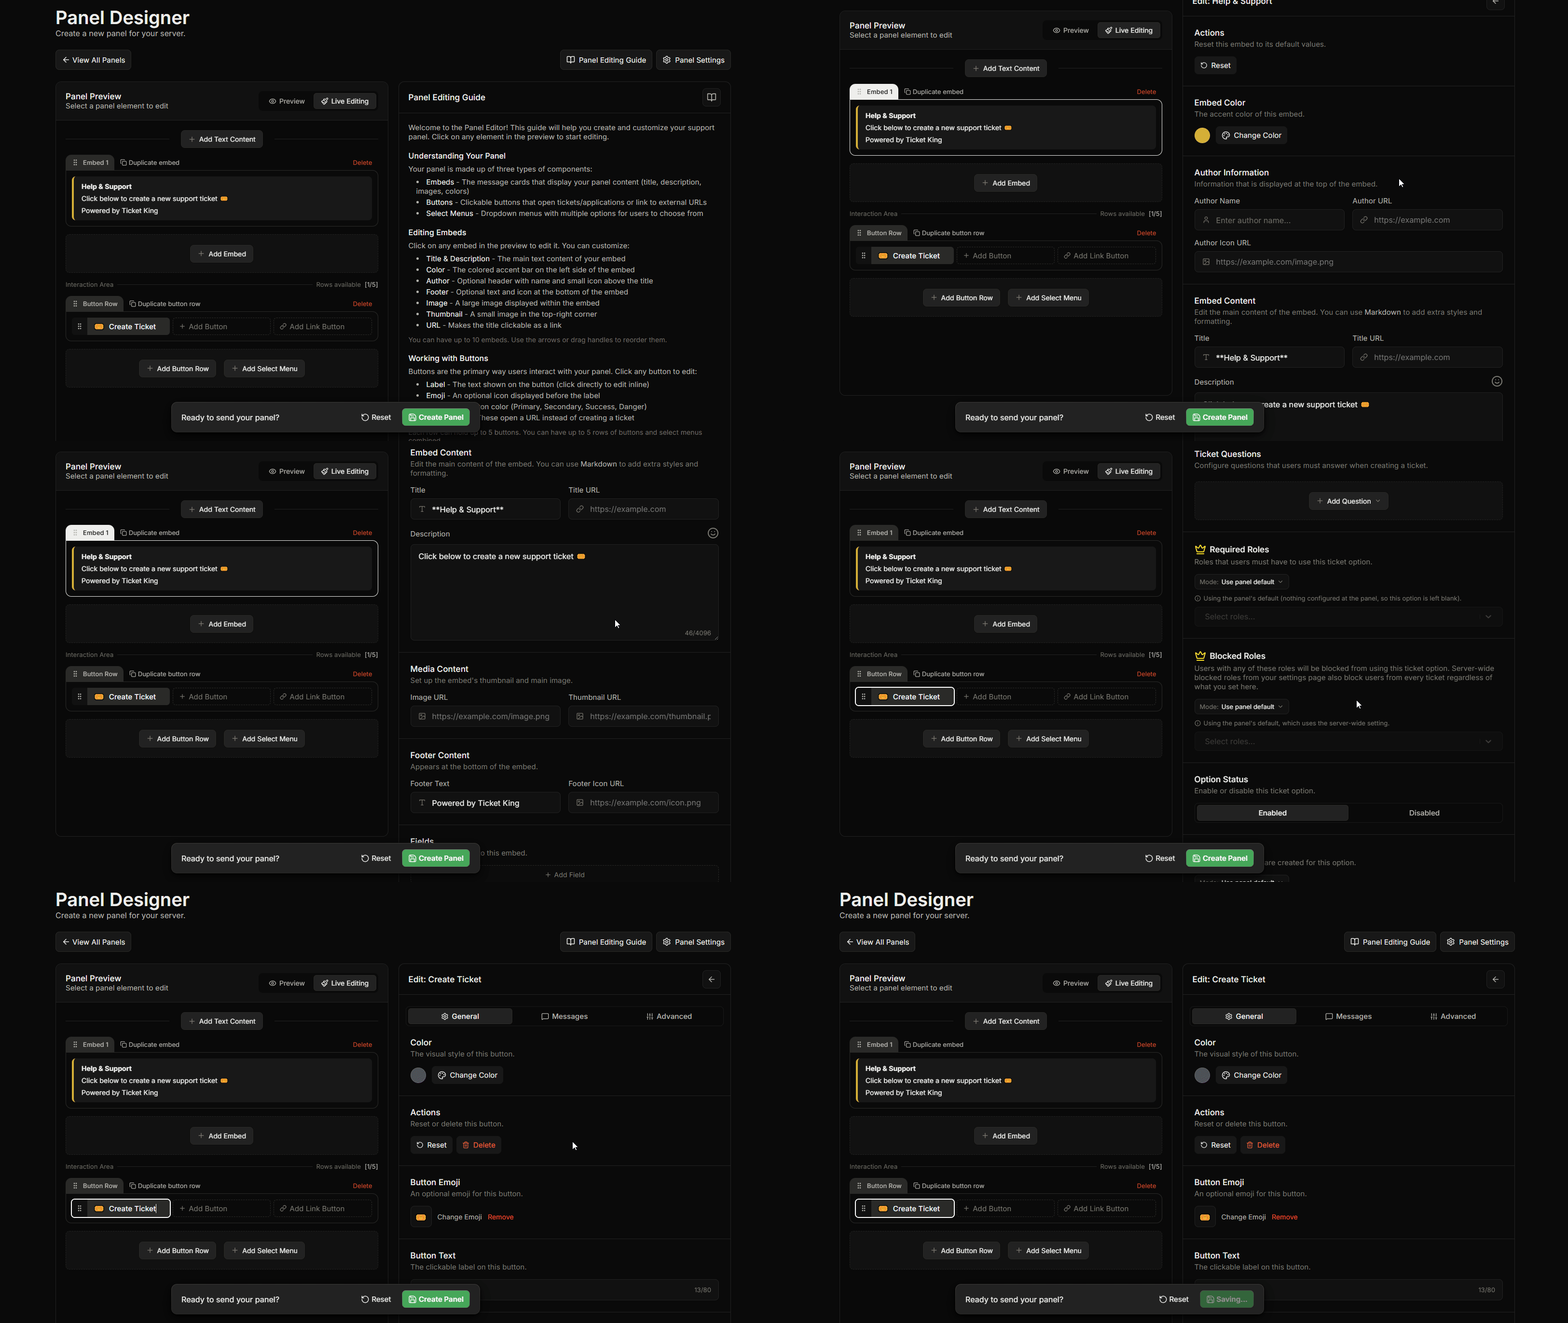
En el editor puedes cambiar la inserción (título, descripción, color, imagen, pie de página), el botón (etiqueta, color, emoji) y la configuración por opción (categoría, rol de soporte, preguntas del formulario). Los valores predeterminados funcionan para un primer panel, así que este paso es opcional.
→ [Editar un panel](/docs/es/paneles/edit-a-panel.md)
{% endstep %}
{% step %}
### Guardar
Haz clic en **Guardar**. El bot publica el panel en el canal que elegiste. Ahora tienes un sistema de tickets funcional.
{% endstep %}
{% step %}
### Añade a tu equipo de soporte
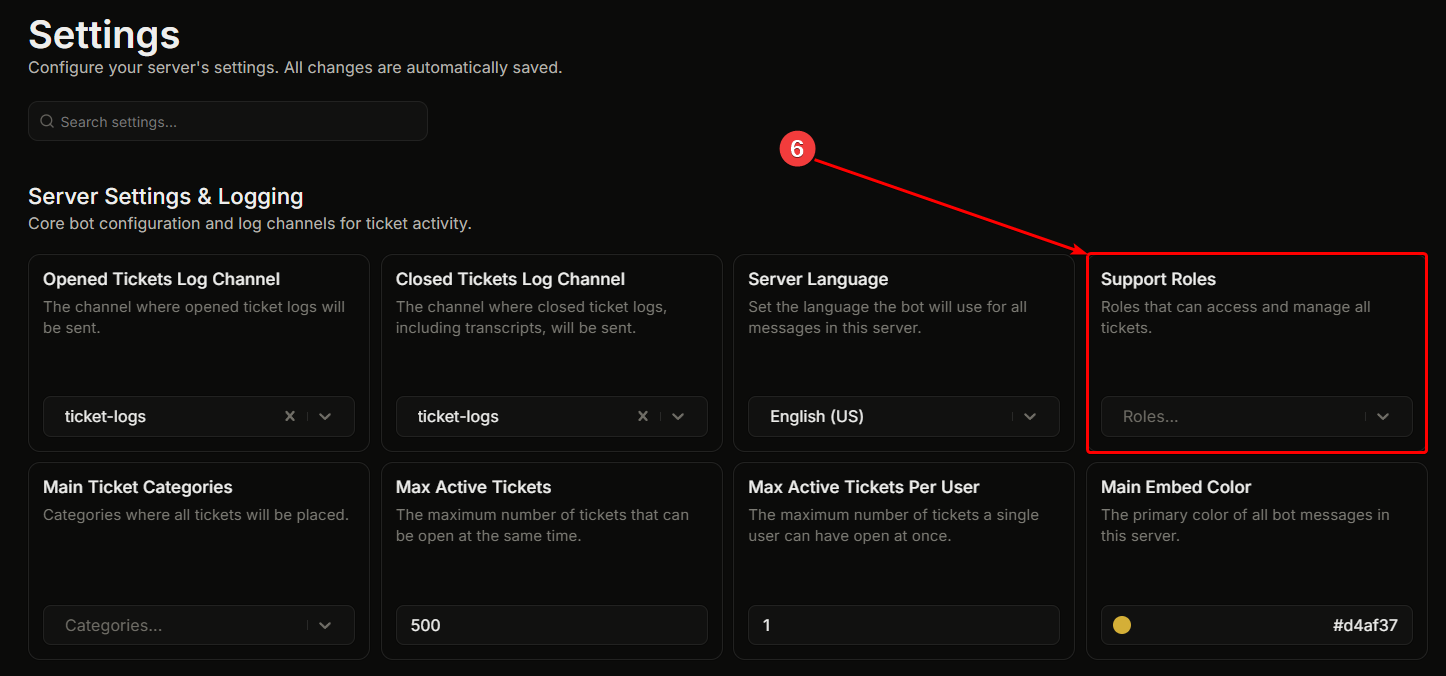
Sin un rol de soporte, solo el propietario del servidor y los miembros con permisos de Administrador o Gestionar servidor pueden ver los nuevos tickets. Para dar acceso a tu equipo, ve a **Ajustes**, luego **Roles de soporte**, y añade el rol de Discord de tu equipo. La configuración se guarda automáticamente.
→ [Roles de soporte](/docs/es/permisos-y-tu-equipo-de-soporte/support-roles.md)
{% endstep %}
{% endstepper %}
## Pruébalo como un miembro
Antes de anunciar tu nuevo sistema de tickets, abre un ticket tú mismo para asegurarte de que funciona de principio a fin.
{% content-ref url="/pages/9e341a821979e503a0d682b80f17335376de7136" %}
[Pruébalo como un miembro](/docs/es/primeros-pasos/test-it-like-a-member.md)
{% endcontent-ref %}
## Problemas comunes
{% hint style="danger" %}
**El botón muestra "Esta interacción falló" o no sucede nada.** Cuando esto sucede, el bot nunca recibió tu clic o no pudo responder. Las causas habituales son:
* El bot está desconectado. Consulta la [página de estado](/docs/es/obtener-ayuda-y-comunidad/status-page.md), y vuelve a intentarlo en un momento.
* El bot ya no está en tu servidor. Es posible que otro bot, como un bot anti-raid, lo haya eliminado. Vuelve a invitar a Ticket King con el [enlace de invitación](https://ticketking.xyz/invite?via=docs).
* El bot no puede ver el canal en el que está el panel. Asegúrate de que el rol de Ticket King tenga Ver canal en ese canal.
Si el bot responde en cambio con un mensaje de error, ese mensaje te está indicando qué está mal, así que síguelo. Por ejemplo, si dice que le falta un permiso, concede ese permiso al rol de Ticket King.
{% endhint %}
{% hint style="warning" %}
**Se abre un ticket, pero mi equipo de soporte no puede verlo.** O bien aún no has añadido un rol de soporte (consulta el último paso anterior), o el rol de Ticket King está por debajo de tu rol de soporte en Discord. Arrastra el rol de Ticket King por **Ajustes del servidor**, luego **Roles**, para que el bot pueda darles acceso.
{% endhint %}
---
# Agent Instructions
This documentation is published with GitBook. GitBook is the documentation platform designed so that both humans and AI agents can read, navigate, and reason over technical content effectively. Learn more at gitbook.com.
## Querying This Documentation
If you need additional information that is not directly available in this page, you can query the documentation dynamically by asking a question.
Perform an HTTP GET request on the current page URL with the `ask` query parameter, and the optional `goal` query parameter:
```
GET https://ticketking.xyz/docs/es/primeros-pasos/build-your-first-panel.md?ask=&goal=
```
`ask` is the immediate question: it should be specific, self-contained, and written in natural language.
`goal` is optional and describes the broader end goal you are ultimately trying to accomplish on behalf of the user. GitBook uses it to tailor the answer towards what is most useful for that goal.
The response will contain a direct answer to the question and relevant excerpts and sources from the documentation.
Use this mechanism when the answer is not explicitly present in the current page, you need clarification or additional context, or you want to retrieve related documentation sections.